Installation and recovery
Prerequisites
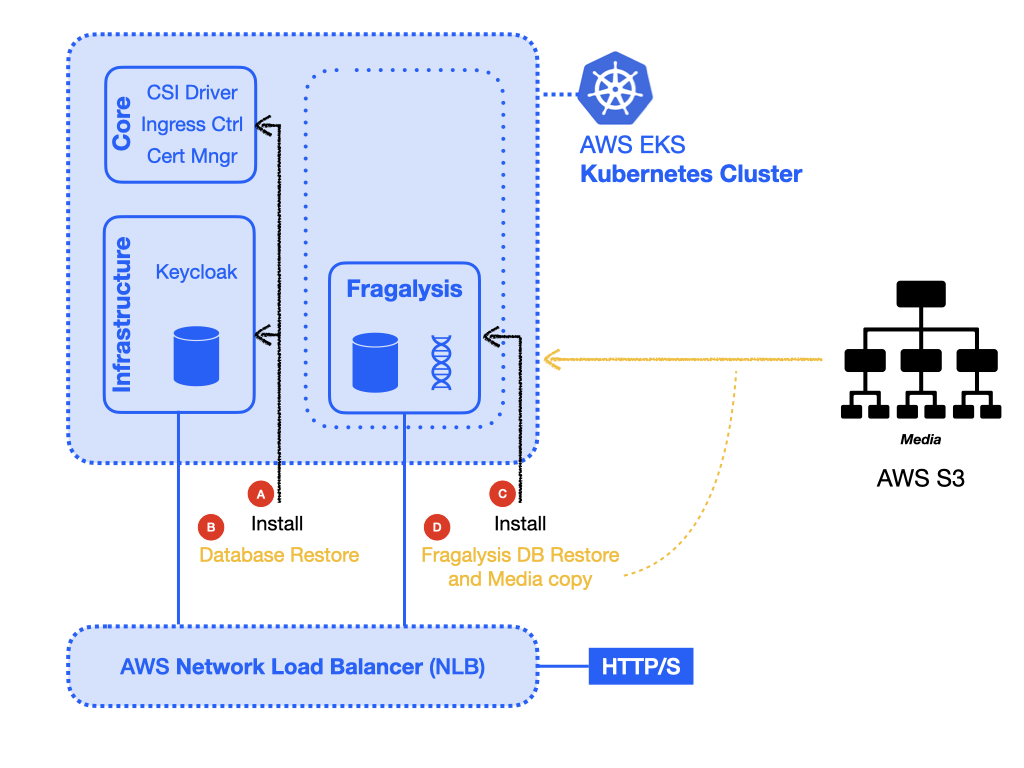
For a Stack without access to a Graph database you will need the following: -
A
KUBECONFIGfile (providing admin access to each cluster)A compatible kubectl client (i.e. kubectl 1.23)
An ACME/let’s encrypt account (for SSL certificates) (letsencrypt)
Note
You could create a cluster with one worker of 16 cores and 32Gi RAM, or two worker nodes, each providing 8 cores and 16Gi RAM. On AWS having multiple nodes will probably be no real advantage. AWS EKS is extremely robust and resilient and the cost of will ultimately depend on the total cores and RAM you’re using.
Installation and recovery
Creating an EKS cluster
Warning
To avoid the following steps for disturbing any local KUBECONFIG file you may
have defined you should run unset KUBECONFIG before proceeding.
Create a cluster in AWS using eksctl. The best way to do this is by defining
your cluster in a cluster.yaml file. The following example, which creates
a Kubernetes 1.23 cluster in London (eu-west-2), should be sufficient
for our needs:
---
apiVersion: eksctl.io/v1alpha5
kind: ClusterConfig

metadata:
  name: fragalysis-production
  region: eu-west-2
  version: '1.23'

availabilityZones:
- eu-west-2a
- eu-west-2b
- eu-west-2c

managedNodeGroups:
- name: mng-1
  # The 2xlarge is an 8 core 32Gi instance
  instanceType: m5.2xlarge
  minSize: 1
  maxSize: 1
  desiredCapacity: 1
  volumeSize: 80
  volumeType: gp2
  labels:
    informaticsmatters.com/purpose-core: 'yes'
    informaticsmatters.com/purpose-worker: 'yes'
    informaticsmatters.com/purpose-application: 'yes'
This file can be found in the fragalysis-stack-kubernetes repository
(as eks-relocation/cluster.yaml).
Note
The schema for the cluster.yaml file can be found on the eksctl schema page.
It is vitally important that the cluster version you have chosen is compatible with the kubernetes cluster we are relocating. At the time of writing this is 1.23.
With a cluster configuration available, create it with the following command:
eksctl create cluster -f cluster.yaml
The cluster should be ready in about 15 minutes. Once it is ready you will find
that cluster credentials were added in ~/.kube/config.
If you need to you can list and select a kubernetes context using the context NAME
using kubectl:
kubectl config get-contexts
kubectl config set current-context MY-CONTEXT
You’ll now be able to inspect your new cluster with kubectl, where you should
discover one node:
kubectl get nodes
Core components
Before installing Keycloak and the Fragalysis Stack you will need to configure and install some core components, namely: -
Configure Amazon EBS CSI driver to create a GP2 StorageClass
Install an NGINX Ingress Controller
Install the SSL Certificate Manager
Configure the cluster’s load balancer
Setup domain routing
Create a cluster admin ServiceAccount
But first, if you need to, set the KUBECONFIG environment variable to point to
your KUBECONFIG file. This will be used by the kubectl client to access your
cluster and our playbooks:
export KUBECONFIG=/path/to/your/kubeconfig
EBS CSI driver
From EKS 1.23 a Container Storage Interface (CSI) driver is needed in order to get your PersistentVolumeClaims served by a PersistentVolume as you are used to from earlier EKS versions (see aws-ebs-csi-driver for more information).
Firstly, setup the driver permissions using kubectl to create a secret from your
AWS credentials:
kubectl create secret generic aws-secret \
    --namespace kube-system \
    --from-literal "key_id=${AWS_ACCESS_KEY_ID}" \
    --from-literal "access_key=${AWS_SECRET_ACCESS_KEY}"
Then, use the kubectl kustomize feature to deploy the driver:
kubectl apply -k "github.com/kubernetes-sigs/aws-ebs-csi-driver/deploy/kubernetes/overlays/stable/?ref=release-1.23"
Ingress Controller
Use kubectl to install a recent NGINX Ingress Controller, used as an in-cluster
load balancer and required by the various application Ingress definitions:
repo=https://raw.githubusercontent.com/kubernetes/ingress-nginx
path=deploy/static/provider/cloud/deploy.yaml
version=controller-v1.9.1

kubectl apply -f ${repo}/${version}/${path}
Note
You can check the condition of the installation (which may take a few minutes)
by inspecting the Pods in the ingress-nginx namespace:
kubectl get pods --namespace ingress-nginx
Certificate Manager
Use kubectl to install a recent Certificate Manager, used to automatically
provision SSL certificates for the kubernetes Ingress definitions:
repo=https://github.com/cert-manager/cert-manager/releases/download
path=cert-manager.yaml
version=v1.13.1

kubectl apply -f ${repo}/${version}/${path}
Note
You can check the condition of the installation (which may take a few minutes)
by inspecting the Pods in the cert-manager namespace:
kubectl get pods --namespace cert-manager
You will also need to provide a ClusterIssuer definition that allows the application
Ingress definitions to trigger the automatic creation of SSL certificates. We use
ACME (Let’s encrypt) and suggest you do to. For this you will need to have registered
and have the email address you used to register.
Armed with your let’s encrypt account email address create a
file called cluster-issuer.yaml with the following content
(replacing <EMAIL-ADDRESS> by one appropriate for you):
---
kind: ClusterIssuer
apiVersion: cert-manager.io/v1
metadata:
  name: letsencrypt-nginx-production
spec:
  acme:
    email: <EMAIL-ADDRESS>
    privateKeySecretRef:
      name: letsencrypt-nginx-production
    server: https://acme-v02.api.letsencrypt.org/directory
    solvers:
    - http01:
        ingress:
          ingressClassName: nginx
You will find a template file in the eks-relocation directory that you can edit.
The name of the ClusterIssuer is important, and it is expected to be
called letsencrypt-nginx-production.
Once you have a valid ClusterIssuer you can then apply the definition to your cluster:
kubectl apply -f cluster-issuer.yaml
Configure the cluster’s load balancer
Check on what is probably an “inactive” Classic Load Balancer that will have been created in your AWS region and then Migrate it by clicking the Launch NLB migration wizard button. From the new page simply click the Create button to create a Network Load Balancer (NLB), and close the final window upon success.
Note
If you return to the Load Balancers page you will probably find the LB State to be Provisioning. This may take a few minutes so refresh the page after a minute or two. When it is Active make sure your EKS cluster EC2 instances are in the Listeners Target Group for the pre-assigned Protocols.
Setup domain routing
With the cluster prepared now is the time to arrange for any applicable domain names to be re-routed to the assigned DNS name of the NLB created for your EKS cluster.
For us we’ll need to make sure the following domains are routed to the NLB via a suitable A record:
fragalysis.diamond.ac.uk
*.xchem.diamond.ac.uk (for the keycloak server)
The DNS name for the NLB will be of the form 000000-000000.elb.eu-west-2.amazonaws.com,
and this should be used as an A record (or A record alias) for the
appropriate domains.
Do this as soon as you can as DNS changes may take a few minutes but they can also take several hours.
A cluster service account
To allow users other than the cluster creator to access the cluster you will need
to add a ServiceAccount that will allow you to create a token that can be used
in the KUBECONFIG file.
Create the required Namespace, ServiceAccount and ClusterRoleBinding with
the following command, run from the eks-relocation directory:
kubectl create -f im-eks-admin
Now, add the service account and its token as a new user definition
to the KUBECONFIG file. You can refer to the documentation for
Adding a Service Account:
TOKEN=$(kubectl get secrets -n im-eks-admin \
    -o jsonpath="{.items[?(@.metadata.annotations['kubernetes\.io/service-account\.name']=='im-eks-admin')].data.token}"\
    |base64 --decode)
kubectl config set-credentials im-eks-admin --token=${TOKEN}
Now you can set the new user for future kubectl commands:
kubectl config set-context --current --user=im-eks-admin
Infrastructure components
With the base components installed you can now install the infrastructure.
Because we are recovering the infrastructure database from elsewhere the creation of the infrastructure will take several steps: -
Create the infrastructure database server
Restore the infrastructure databases
Create the keycloak instance
For our application Pods we will need to label the worker nodes in the cluster.
If you’ve used the example cluster.yaml file you can skip these labelling commands
as the eksctl utility will ensure that any nodes it creates will have the
appropriate labels applied.
To label nodes we apply them to each node.
Run the following for each node in your cluster:
node=<NODE-NAME>
kubectl label nodes ${node} informaticsmatters.com/purpose-core=yes
kubectl label nodes ${node} informaticsmatters.com/purpose-worker=yes
kubectl label nodes ${node} informaticsmatters.com/purpose-application=yes
From this point we rely on Ansible playbooks that are provided in the the Informatics Matters ansible-infrastructure repository, so you will need to clone the recommended version now:
git clone https://github.com/InformaticsMatters/ansible-infrastructure.git
cd ansible-infrastructure
git checkout 2023.4
All the playbooks are controlled by variables that we typically define in a YAML parameter file. A number of parameter files exist in the root of the repository, encrypted using ansible-vault. You will need to create your own parameter file and decide whether you want to encrypt it. You might want to if the parameters contain sensitive information (but encryption is not covered here).
Note
Use parameters.template in the ansible-infrastructure repository
in as a template for your own parameter file.
Infrastructure database server
For this exercise the following, written to parameter.yaml (ignored by the
project gitignore file), should suffice. Replace <NEW-ADMIN-PASSWORD>,
<HOSTNAME>, <KEYCLOAK-DB-PASSWORD>, and <KEYCLOAK-ADMIN-PASSWORD>
as appropriate:
---
cm_state: absent
ic_state: absent
efs_state: absent
cinder_state: absent
ax_state: absent

pg_version: 12.3-alpine
pg_vol_storageclass: gp2
pg_vol_size_g: 18
pg_create_users_and_databases: no
pg_user: postgres
pg_user_password: <NEW-ADMIN-PASSWORD>
pg_database: postgres
pg_bu_state: absent

kc_state: absent
kc_hostname: <HOSTNAME>
kc_user_password: <KEYCLOAK-DB-PASSWORD>
kc_admin_password: <KEYCLOAK-ADMIN-PASSWORD>
Warning
As we’re replicating an existing installation be sure to use a different
admin user and password (NEW-ADMIN-PASSWORD).
With parameters set we should now be able to deploy an “empty” infrastructure database server:
ansible-playbook site.yaml -e @parameters.yaml
Restore the database
With a new “empty” infrastructure installed we can now restore the database from
a backup of the original. You can use the AWS CLI and kubectl to copy
the backup from S3 to the PostgreSQL Pod’s database volume, and then restore the data
using psql from within the Database Pod.
Copy the backup from your AWS S3 bucket onto your control machine and then write it into the database Pod:
aws s3 cp \
    s3://im-fragalysis/production-keycloak-db/backup-2023-10-16T12\:07\:01Z-dumpall.sql.gz \
    ./dumpall.sql.gz

kubectl cp ./dumpall.sql.gz \
    database-0:/tmp/dumpall.sql.gz \
    -n im-infra
You can now shell into the Pod, and decompress and load the backup:
kubectl exec -it database-0 -n im-infra -- bash
cd /tmp
gzip -d dumpall.sql.gz
psql -q -U postgres -f dumpall.sql template1
When the load is complete exit the Pod:
exit
With the database restored use the Database StatefulSet to scale down the Pod (to remove it) and then scale it up again (to restart it), essentially rebooting the database server:
kubectl scale statefulset database --replicas=0 -n im-infra
Wait for the Pod to terminate and then:
kubectl scale statefulset database --replicas=1 -n im-infra
Installing Keycloak
With the original database restored we can install Keycloak by adjusting our parameter file and re-running the same infrastructure playbook.
Ensure the following parameter values are now set in your parameter file:
kc_state: present
kc_version: 10.0.2
And then re-run the infrastructure playbook:
ansible-playbook site.yaml -e @parameters.yaml
Verify that you are able to reach the Keycloak server at the hostname you defined
by appending /auth.
Production Stack
From this point we rely on Ansible playbooks that are provided in the the fragalysis-stack-kubernetes repository, so you will need to clone a recommended version now:
git clone https://github.com/xchem/fragalysis-stack-kubernetes.git
cd fragalysis-stack-kubernetes
git checkout 2025.23
Deploy the database
We need a new set of parameters to replicate the database installation.
You will find a parameters.template.yaml in the eks-relocation directory.
You can use this to create a parameters.yaml file in the project root
(which is protected by the .gitignore).
Create a parameters.yaml and populate it with the following (always check with
the installation you are relocating to ensure the parameters are compatible):
---
database_image_tag: '15.8'
database_vol_size_g: 18
database_vol_storageclass: gp2
database_root_user: postgres
database_root_password: anything-you-like
database_create_users_and_databases: no
database_bu_state: present
database_bu_vol_storageclass: gp2
database_bu_vol_size_g: 18

stack_namespace: production-stack
stack_is_for_developer: no
stack_skip_deploy: yes
stack_discourse_host: ''

install_prerequisite_python_modules: no
The root user password can be any value you like, the database has no public facing surface. Only those with access to the cluster will be able to access it.
And then run the stack playbook. Because we are including sensitive material that’s encrypted in this repository we’ll need to provide a vault password. (more on this later):
ansible-playbook site-fragalysis-stack.yaml \
    -e @parameters.yaml \
    --ask-vault-password
Restore the database
Just as we did with the infrastructure database we restore the database from a backup of the original production stack.
Copy the backup from your AWS S3 bucket onto your control machine and then write it into the database Pod:
aws s3 cp \
    s3:///nw-xch-prod-v2-production-stack-backup/backup-2023-10-16T12\:51\:01Z-frag.sql.gz \
    ./frag.sql.gz

kubectl cp ./frag.sql.gz \
    database-0:/tmp/frag.sql.gz \
    -n production-stack
This is likely to be a large file, so it may take a while to copy into the Pod.
Once done you can shell into the Pod, and decompress and load the backup:
kubectl exec -it database-0 -n production-stack -- bash
cd /tmp
gzip -d frag.sql.gz
psql -X -U postgres frag -f frag.sql
This is likely to be a large file, so it may take a while to load.
When the load is complete exit the Pod:
exit
With the database restored use the Database StatefulSet to scale down the Pod (to remove it) and then scale it up again (to restart it), essentially rebooting the database server:
kubectl scale statefulset database --replicas=0 -n production-stack
Wait for the Pod to terminate and then:
kubectl scale statefulset database --replicas=1 -n production-stack
Deploy the Stack
Now we can adjust our parameters.yaml so that it can now be re-executed to
install the stack against the recovered database.
Importantly, set your existing stack_skip_deploy to no and then add the
following to your parameters.yaml. The memory and volume sizes are
correct for the production stack deployed at the time of writing.
Set the <PRODUCTION-TAG> to that used during the database backup:
stack_image_tag: <PRODUCTION-TAG>
stack_mem_limit: 15Gi
stack_mem_request: 15Gi
stack_media_vol_size_g: 200
stack_media_vol_storageclass: gp2
Remember to check that the stack_media_vol_size_g suits your needs.
Note
A number of crucial Ansible variables and values are also encrypted in the file
roles/fragalysis-stack/vars/sensitive.vault, and includes configuration
values.
You can view the sensitive file, without permanently decrypting, using the command
ansible-vault view roles/fragalysis-stack/vars/sensitive.vault.
With suitable values in our revised parameters.yaml file, which will complement
those in the sensitive.vault file, we can re-run the stack playbook:
ansible-playbook site-fragalysis-stack.yaml \
    -e @parameters.yaml \
    --ask-vault-password
Populate the media directory
As the media directory resides on a volume in the stack Pod, which is a python
container, it will be faster to copy the media from your chosen S3 bucket
directly to the /code/media directory from within the Pod (rather than
downloading to your control machine and then then uploading into the Pod).
Shell into the Pod:
kubectl exec -it stack-0 -n production-stack -- bash
Add your AWS credentials (ones that allow you to access the S3 bucket):
export AWS_ACCESS_KEY_ID=00000000
export AWS_SECRET_ACCESS_KEY=00000000
export AWS_DEFAULT_REGION=eu-west-2
Then install the AWS CLI and copy the media from your S3 bucket:
pip install awscli
cd /code/media
aws s3 cp --recursive s3://im-fragalysis/production-stack-media/ .
The media directory is likely to consist of a lot of files. Expect the copy to take a while, probably 20 to 30 minutes per 150Gi.
*Congratulations! Your relocated production stack should be ready to use.